
JDeveloper 10.1.3.3 build 4157 has now been released to OTN for download:
http://www.oracle.com/technology/software/products/jdev/htdocs/soft10133.html
A list of the bugs fixed in this release can be found at:
http://www.oracle.com/technology/products/jdev/htdocs/10.1.3.3/fixlist.htm
fredag, juni 29, 2007
tisdag, juni 26, 2007
Altering the Show/Hide Text of a "detailStamp" Facet
Another question that is related to the one that I answered in my previous post is how you can alter the Show/Hide text in the <f:facet name="detailStamp">. The answer to this one is to use the <af:showDetail id="showDetail1"> component instead and set the attributes disclosedText and undisclosedText.
If you drag and drop a Master table with in-line details in a JSF page with JDeveloper, it will generate code like:
<f:facet name="detailStamp">
<af:table rows="#{bindings.DeptView1.rangeSize}"
emptyText="No rows yet." var="detailRow"
value="#{row.children}">
<af:column headerText="#{row.children[0].labels.Ename}"
sortable="false" sortProperty="Ename">
<af:outputText value="#{detailRow.Ename}"/>
</af:column>
<af:column headerText="#{row.children[0].labels.Job}"
sortable="false" sortProperty="Job">
<af:outputText value="#{detailRow.Job}"/>
</af:column>
</af:table>
</f:facet>
for the in-line table. Here you cannot change the generated Show/Hide text that ADF generates. See the image below (in Swedish):
 If you want to modify these, to something like:

you need to use some code along the line of:
<af:column headerText="Test" sortable="false">
<af:showDetail id="showDetail1" disclosedText="Brown" undisclosedText="Charlie">
<af:table rows="#{bindings.DeptView1.rangeSize}"
emptyText="No rows yet." var="detailRow"
value="#{row.children}">
<af:column headerText="#{row.children[0].labels.Ename}"
sortable="false" sortProperty="Ename">
<af:outputText value="#{detailRow.Ename}"/>
</af:column>
<af:column headerText="#{row.children[0].labels.Job}"
sortable="false" sortProperty="Job">
<af:outputText value="#{detailRow.Job}"/>
</af:column>
</af:table>
</af:showDetail>
</af:column>
If you do not want to have any text at all, just set the attributes disclosedText="" and undisclosedText="".
If you drag and drop a Master table with in-line details in a JSF page with JDeveloper, it will generate code like:
<f:facet name="detailStamp">
<af:table rows="#{bindings.DeptView1.rangeSize}"
emptyText="No rows yet." var="detailRow"
value="#{row.children}">
<af:column headerText="#{row.children[0].labels.Ename}"
sortable="false" sortProperty="Ename">
<af:outputText value="#{detailRow.Ename}"/>
</af:column>
<af:column headerText="#{row.children[0].labels.Job}"
sortable="false" sortProperty="Job">
<af:outputText value="#{detailRow.Job}"/>
</af:column>
</af:table>
</f:facet>
for the in-line table. Here you cannot change the generated Show/Hide text that ADF generates. See the image below (in Swedish):
 If you want to modify these, to something like:

you need to use some code along the line of:
<af:column headerText="Test" sortable="false">
<af:showDetail id="showDetail1" disclosedText="Brown" undisclosedText="Charlie">
<af:table rows="#{bindings.DeptView1.rangeSize}"
emptyText="No rows yet." var="detailRow"
value="#{row.children}">
<af:column headerText="#{row.children[0].labels.Ename}"
sortable="false" sortProperty="Ename">
<af:outputText value="#{detailRow.Ename}"/>
</af:column>
<af:column headerText="#{row.children[0].labels.Job}"
sortable="false" sortProperty="Job">
<af:outputText value="#{detailRow.Job}"/>
</af:column>
</af:table>
</af:showDetail>
</af:column>
If you do not want to have any text at all, just set the attributes disclosedText="" and undisclosedText="".
torsdag, juni 21, 2007
Hiding the Header for the Selection Facet
A question that I have seen on a few occasions is how you can hide the "Select" heading in the table when using the selection facet. Here is a solution for that problem that is based on this entry: http://www.orablogs.com/fnimphius/archives/001973.html in Frank Nimphius blog. Please note that, as Frank writes, that "Note that the CSS uses translateable text (or here translateable component names) to identify the component, which makes this solution weak.".
You can hide the 'Select' text by setting the text size to 0 for the concerned table header style (using display:none will not work, as it will cause the table headers to display over the incorrect column).
Here is the Table as default:
 The "Select" (or in Swedish "Välj") header is controlled by this style (th.x2z) element (see page source):
<th scope="col" width="1%" nowrap class="x2z">Välj</th>
Now you can alter the af:tableSelectMany by changing the code in the page to:
<f:facet name="selection">
<af:tableSelectMany text="Test">
<f:verbatim>
<style type="text/css">
th.x2z{font-size: 0};
</style>
</f:verbatim>
</af:tableSelectMany>
</f:facet>
This will result in the following table:

Now the "Select" (or "Välj") test is set to 0 size, thus will not be displayed.
You can hide the 'Select' text by setting the text size to 0 for the concerned table header style (using display:none will not work, as it will cause the table headers to display over the incorrect column).
Here is the Table as default:
 The "Select" (or in Swedish "Välj") header is controlled by this style (th.x2z) element (see page source):
<th scope="col" width="1%" nowrap class="x2z">Välj</th>
Now you can alter the af:tableSelectMany by changing the code in the page to:
<f:facet name="selection">
<af:tableSelectMany text="Test">
<f:verbatim>
<style type="text/css">
th.x2z{font-size: 0};
</style>
</f:verbatim>
</af:tableSelectMany>
</f:facet>
This will result in the following table:

Now the "Select" (or "Välj") test is set to 0 size, thus will not be displayed.
torsdag, juni 14, 2007
Running a JAR File that Includes Another JAR From the Command Prompt
Today I got a question from a colleague on how-to run a JAR file that includes another JAR file directly from the command prompt, he couldn't get this to work - it just ended up with java.lang.NoClassDefFoundError exception. At first glance this seemed quite trivial, but it turned out to be more complicated than I first thought. My initial attempts also resulted in java.lang.NoClassDefFoundError, so I started to search around a bit for further information about the topic. This led me to this site http://one-jar.sourceforge.net/, and (as always) it turned out that someone else already solved the problem.
As I use JDeveloper (of course...) it needs to be added a few steps in addition to using one-jar to get the whole process to work, this is documented below.
1. First I created a new Workspace in JDeveloper with 2 projects 'mainproject' and 'subproject'.
2. In the 'subproject' there is a single dummy that have one method that just writes something to the System.out. There is also a JAR deployment profile that includes the mentioned class. The target JAR file I just called sub.jar.
3. Now it's time to create the 'mainproject'. As I am using the One-JAR in the end there are 2 restrictions I need to take into account for this project:
a. The main class needs to be named 'Main'
b. The target JAR file needs to be called 'main.jar'
I created a new class called 'Main' in the 'mainproject', added a dependency in the Project Properties to 'subproject' and created a dummy method in this class that uses the class created under 2. I ran the Main class inside JDeveloper to ensure that it worked before proceeding.
After that I created a JAR deployment profile. I made sure to name the target JAR file to 'main.jar'. Also checked the 'Include Manifest File (META-INF/MANIFEST.MF)' box and pointed the 'Main Class' to my 'Main' class. Next I made sure NOT to include my classes from the 'subproject' into this JAR file. This as they will be provided in a separate JAR file.
4. Next, it was time to download and install One-JAR. One-JAR can be downloaded from http://sourceforge.net/projects/one-jar. I created a new empty folder on my file system and placed the one-jar-boot-0.95.jar file there and renamed this to one-jar.jar. In my newly created folder I also added 2 subfolders 'main' and 'lib'. Once done I deployed my 2 JAR filed from JDeveloper, main.jar and sub.jar and placed them in the respective folders (main.jar in main and sub.jar in lib). The archive now has a structure similar to what is shown below:
As I use JDeveloper (of course...) it needs to be added a few steps in addition to using one-jar to get the whole process to work, this is documented below.
1. First I created a new Workspace in JDeveloper with 2 projects 'mainproject' and 'subproject'.
2. In the 'subproject' there is a single dummy that have one method that just writes something to the System.out. There is also a JAR deployment profile that includes the mentioned class. The target JAR file I just called sub.jar.
3. Now it's time to create the 'mainproject'. As I am using the One-JAR in the end there are 2 restrictions I need to take into account for this project:
a. The main class needs to be named 'Main'
b. The target JAR file needs to be called 'main.jar'
I created a new class called 'Main' in the 'mainproject', added a dependency in the Project Properties to 'subproject' and created a dummy method in this class that uses the class created under 2. I ran the Main class inside JDeveloper to ensure that it worked before proceeding.
After that I created a JAR deployment profile. I made sure to name the target JAR file to 'main.jar'. Also checked the 'Include Manifest File (META-INF/MANIFEST.MF)' box and pointed the 'Main Class' to my 'Main' class. Next I made sure NOT to include my classes from the 'subproject' into this JAR file. This as they will be provided in a separate JAR file.
4. Next, it was time to download and install One-JAR. One-JAR can be downloaded from http://sourceforge.net/projects/one-jar. I created a new empty folder on my file system and placed the one-jar-boot-0.95.jar file there and renamed this to one-jar.jar. In my newly created folder I also added 2 subfolders 'main' and 'lib'. Once done I deployed my 2 JAR filed from JDeveloper, main.jar and sub.jar and placed them in the respective folders (main.jar in main and sub.jar in lib). The archive now has a structure similar to what is shown below:

5. Now it's time to test this, and if it works correctly then the result should look something like:
D:\home\Demos\OneJARDemo\deploy>java -jar one-jar.jar
Hello from Main
Hello from sub project!
måndag, juni 04, 2007
About Rules and Execution Order
A question that pops-up from time to time is about Rules and execution order, i.e., is there a way to control the execution order of rules? There are technically two ways of doing this. The first way of obtaining this is by using rule priorities, the second is to use the ruleset stack.
However, I believe that using rule priorities in general should really be avoided, and is usually discouraged for two reasons; first, if will impact performance negative with respect to the built-in conflict resolution strategies. Secondly, it is considered bad style to use priorities in rule based programming to try to force a specific order. If you find yourself using priorities for most of your rules, then you should consider if using a rule based approach is really the best solution for your problem. If you want strict control over execution order, then you are really using procedural programming and not rule based programming.
If you still want to execution order, you should use the ruleset stack. This will be a more flexible solution than using a single ruleset and using rule priorities. How to do this is described in the Oracle Business Rules Language Reference, section 1.4.3 'Ordering Rule Firing'.
However, I believe that using rule priorities in general should really be avoided, and is usually discouraged for two reasons; first, if will impact performance negative with respect to the built-in conflict resolution strategies. Secondly, it is considered bad style to use priorities in rule based programming to try to force a specific order. If you find yourself using priorities for most of your rules, then you should consider if using a rule based approach is really the best solution for your problem. If you want strict control over execution order, then you are really using procedural programming and not rule based programming.
If you still want to execution order, you should use the ruleset stack. This will be a more flexible solution than using a single ruleset and using rule priorities. How to do this is described in the Oracle Business Rules Language Reference, section 1.4.3 'Ordering Rule Firing'.
onsdag, maj 30, 2007
ADF Faces Multi Select Table using JDeveloper 11g Technology Preview
About a year ago Frank Nimphius wrote this post (http://www.orablogs.com/fnimphius/archives/001778.html) about multi-selection in ADF Faces tables. I tried out this approach recently using the JDeveloper 11g Technology Preview release and found that things have changed slightly since then. The purpose here is not to fully describe this feature, for that please see Frank's post, but to point to the changes between 10.1.3 and the 11g Preview version.
These are the main changes in short:
Once you have created the table using 11g, you will notice that it looks slightly different:

As mentioned before, you no longer needs to use a 'tableSelectMany' component to get multi-selections for the table, instead you define the 'rowSelection' and 'binding' attributes directly on the 'table' element, like:
<af:table value="#{bindings.DeptView1.collectionModel}" var="row"
rows="#{bindings.DeptView1.rangeSize}"
first="#{bindings.DeptView1.rangeStart}"
emptyText="#{bindings.DeptView1.viewable ? 'No rows yet.' : 'Access Denied.'}"
fetchSize="#{bindings.DeptView1.rangeSize}"
rowSelection="multiple" id="table1"
selectionListener="#{api.table1_selectionListener}"
binding="#{api.myTable}"
>
Next, you need to map the managed bean to use the RichTable class, like:
<managed-property>
property-name myTable /property-name
property-class oracle.adf.view.rich.component.rich.data.RichTable /property-class
value>#{table1} /value
/managed-property
private RichTable _table;
public RichTable getMyTable() {
return _table;
}
public void setMyTable(RichTable table) {
this._table = table;
}
As mentioned before, the way to iterate through the rows have also changed a bit. In 10.1.3 you could use:
Key _key = (Key) keyIter.next();
directly, in 11g I noticed that you have to use this approach instead:
List l = (List)rowSetIter.next();
Key key = (Key)l.get(0);
Also, you use the 'getSelectedRowKeys()' method instead of 'getSelectionState().getKeySet()'. The full code will look something like:
RichTable table = this.getMyTable();
RowKeySet rowSet = table.getSelectedRowKeys();
Iterator rowSetIter = rowSet.iterator();
DCBindingContainer bindings = this.getBindingContainer();
DCIteratorBinding iter = bindings.findIteratorBinding("DeptView1Iterator");
while (rowSetIter.hasNext()) {
List l = (List)rowSetIter.next();
Key key = (Key)l.get(0);
iter.setCurrentRowWithKey(key.toStringFormat(true));
Row r = iter.getCurrentRow();
System.out.println("selected dept " + r.getAttribute("Dname"));
}
Finally, with these changes in mind, the result of the above should end up in an output similar to:
07/05/30 13:36:33 selected dept SALES
07/05/30 13:36:33 selected dept RESEARCH
I hope this have illustrated the changes between the 10.1.3 and the 11g Preview Release for the multi-selection table.
These are the main changes in short:
- No need to create the selectMany component any longer.
- A Slightly different way to iterate through the rows is needed.
Once you have created the table using 11g, you will notice that it looks slightly different:
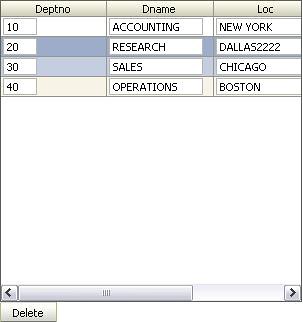
As mentioned before, you no longer needs to use a 'tableSelectMany' component to get multi-selections for the table, instead you define the 'rowSelection' and 'binding' attributes directly on the 'table' element, like:
<af:table value="#{bindings.DeptView1.collectionModel}" var="row"
rows="#{bindings.DeptView1.rangeSize}"
first="#{bindings.DeptView1.rangeStart}"
emptyText="#{bindings.DeptView1.viewable ? 'No rows yet.' : 'Access Denied.'}"
fetchSize="#{bindings.DeptView1.rangeSize}"
rowSelection="multiple" id="table1"
selectionListener="#{api.table1_selectionListener}"
binding="#{api.myTable}"
>
Next, you need to map the managed bean to use the RichTable class, like:
<managed-property>
private RichTable _table;
public RichTable getMyTable() {
return _table;
}
public void setMyTable(RichTable table) {
this._table = table;
}
As mentioned before, the way to iterate through the rows have also changed a bit. In 10.1.3 you could use:
Key _key = (Key) keyIter.next();
directly, in 11g I noticed that you have to use this approach instead:
List l = (List)rowSetIter.next();
Key key = (Key)l.get(0);
Also, you use the 'getSelectedRowKeys()' method instead of 'getSelectionState().getKeySet()'. The full code will look something like:
RichTable table = this.getMyTable();
RowKeySet rowSet = table.getSelectedRowKeys();
Iterator rowSetIter = rowSet.iterator();
DCBindingContainer bindings = this.getBindingContainer();
DCIteratorBinding iter = bindings.findIteratorBinding("DeptView1Iterator");
while (rowSetIter.hasNext()) {
List l = (List)rowSetIter.next();
Key key = (Key)l.get(0);
iter.setCurrentRowWithKey(key.toStringFormat(true));
Row r = iter.getCurrentRow();
System.out.println("selected dept " + r.getAttribute("Dname"));
}
Finally, with these changes in mind, the result of the above should end up in an output similar to:
07/05/30 13:36:33 selected dept SALES
07/05/30 13:36:33 selected dept RESEARCH
I hope this have illustrated the changes between the 10.1.3 and the 11g Preview Release for the multi-selection table.
tisdag, maj 08, 2007
New Technology Preview Releases of JDeveloper, OC4J & TopLink
The 11.1.1 Technology Preview releases of JDeveloper, OC4J and TopLink are now available for download on OTN. You can find them at these URL's:
JDeveloper:
http://www.oracle.com/technology/products/jdev/11/index.html
TopLink:
http://www.oracle.com/technology/software/products/ias/htdocs/1111topsoft.html
OC4J:
http://www.oracle.com/technology/software/products/ias/htdocs/utilsoft_preview.html
JDeveloper:
http://www.oracle.com/technology/products/jdev/11/index.html
TopLink:
http://www.oracle.com/technology/software/products/ias/htdocs/1111topsoft.html
OC4J:
http://www.oracle.com/technology/software/products/ias/htdocs/utilsoft_preview.html
fredag, april 27, 2007
Problems Calling .Net Web Services from UTL_DBWS
I've been having some issues with a problem from a customer, the scenario is quite simple; they simply want to call a .Net Web Service from the database using utl_dbws. This should be fairly straightforward, however, this did not work as expected, instead I've been keep getting this error message:
ORA-29532: Java call terminated by uncaught Java exception:
javax.xml.rpc.soap.SOAPFaultException: Server did not recognize the value of HTTP Header SOAPAction: .
ORA-06512: at "SYS.UTL_DBWS", line 387
ORA-06512: at "SYS.UTL_DBWS", line 384
and I could simply not figure out why. So, when I read the utl_dbws api for the 111:th time (give or take a few times...) I found that:
"'SOAPACTION_USE': This boolean property indicates whether or not SOAPAction is to be used. The default value of this property is 'FALSE'."
which certainly corresponds to the error message I've been getting, as it indicates that no SOAPAction is being sent.
So, I simply added these lines:
sys.utl_dbws.set_property(call_, 'SOAPACTION_USE', 'TRUE');
sys.utl_dbws.set_property(call_, 'SOAPACTION_URI', 'http://tempuri.org/Hello');
and the request went fine. A few lines that made the difference but took me too long time to find out...
The utl_dbws package is described in:
http://download-uk.oracle.com/docs/cd/B19306_01/appdev.102/b14258/u_dbws.htm#sthref13863
The The SOAPAction HTTP Header Field is described in:
http://www.w3.org/TR/2000/NOTE-SOAP-20000508/#_Toc478383528
ORA-29532: Java call terminated by uncaught Java exception:
javax.xml.rpc.soap.SOAPFaultException: Server did not recognize the value of HTTP Header SOAPAction: .
ORA-06512: at "SYS.UTL_DBWS", line 387
ORA-06512: at "SYS.UTL_DBWS", line 384
and I could simply not figure out why. So, when I read the utl_dbws api for the 111:th time (give or take a few times...) I found that:
"'SOAPACTION_USE': This boolean property indicates whether or not SOAPAction is to be used. The default value of this property is 'FALSE'."
which certainly corresponds to the error message I've been getting, as it indicates that no SOAPAction is being sent.
So, I simply added these lines:
sys.utl_dbws.set_property(call_, 'SOAPACTION_USE', 'TRUE');
sys.utl_dbws.set_property(call_, 'SOAPACTION_URI', 'http://tempuri.org/Hello');
and the request went fine. A few lines that made the difference but took me too long time to find out...
The utl_dbws package is described in:
http://download-uk.oracle.com/docs/cd/B19306_01/appdev.102/b14258/u_dbws.htm#sthref13863
The The SOAPAction HTTP Header Field is described in:
http://www.w3.org/TR/2000/NOTE-SOAP-20000508/#_Toc478383528
måndag, mars 19, 2007
Exposing a Java Service Facade for an EJB 3.0 Entity as a Web Service
A few days ago I tried to expose a Java Service Facade for an EJB 3.0 entity as a Web Service using JDeveloper. At first, I had a problem with this, however, once I found the culprit, it was quite obvious. Here are the steps I took:
2007-03-07 13:46:35.434 ERROR OWS-04046 Caught exception while handling request:
java.lang.NullPointerException java.lang.NullPointerException
So, what was the problem? This problem occurs when the persistance.xml file point to a datasource rather than a direct JDBC connection. Since the JavaServiceFacade class is plain J2SE class, using a datasource in the persistance.xml can be used with EJB application only. For example you can create a EJB SessionFacade and publish this as a Web Service. Once I had re-defined the persistance.xml to point to a direct JDBC connection, it worked, like:
...
<persistence-unit name="WebServicesMetaData">
<class>webservicesmetadata.Countries</class>
<properties>
<property name="toplink.jdbc.driver" value="oracle.jdbc.OracleDriver"/>
<property name="toplink.jdbc.url"
value="jdbc:oracle:thin:@myHost:myPort:mySID"/>
<property name="toplink.jdbc.user" value="hr"/>
<property name="toplink.jdbc.password" value="hr_password"/>
<property name="toplink.target-database" value="Oracle"/>
<property name="toplink.logging.level" value="FINER"/>
</properties>
</persistence-unit>
...
- Created Entity Objects - by using the Wizards in JDeveloper, this went very smooth.
- Created the JavaServiceFacade Exposing the Entity, no problems here either.
- Expose the Java Service Facade as a Web Service using the Wizards. So far so good.
- Configure the persistence.xml file.
2007-03-07 13:46:35.434 ERROR OWS-04046 Caught exception while handling request:
java.lang.NullPointerException java.lang.NullPointerException
So, what was the problem? This problem occurs when the persistance.xml file point to a datasource rather than a direct JDBC connection. Since the JavaServiceFacade class is plain J2SE class, using a datasource in the persistance.xml can be used with EJB application only. For example you can create a EJB SessionFacade and publish this as a Web Service. Once I had re-defined the persistance.xml to point to a direct JDBC connection, it worked, like:
...
<persistence-unit name="WebServicesMetaData">
<class>webservicesmetadata.Countries</class>
<properties>
<property name="toplink.jdbc.driver" value="oracle.jdbc.OracleDriver"/>
<property name="toplink.jdbc.url"
value="jdbc:oracle:thin:@myHost:myPort:mySID"/>
<property name="toplink.jdbc.user" value="hr"/>
<property name="toplink.jdbc.password" value="hr_password"/>
<property name="toplink.target-database" value="Oracle"/>
<property name="toplink.logging.level" value="FINER"/>
</properties>
</persistence-unit>
...
onsdag, februari 28, 2007
Recursion in Rules
Long time since I wrote something about Rules, so, here is a small sample for using recursion in Rules. Implementing recursion in Rules is fairly easy, just assert a new fact in the action-block of a rule, that's it. By asserting a new fact to the system, the system will re-evaluate, and recursion has taken place.
Below is an example that will illustrate this, it will find and print all ancestor relationships that are the result of three parent relationships. Andy is a parent of Betty, Betty is a parent of Charlie and Charlie is a parent of Donna. Which are the resulting ancestor relationships?
Running this program will reveal the result...
ruleset main {
class Parent {
String a;
String b;
}
class Ancestor {
String a;
String b;
}
// Convert a Parent relationship to an Ancestor relationship
rule parentToAncestor {
if ( (fact Parent p) ) {
assert(new Ancestor(a: p.a, b: p.b));
}
}
// If A is parent of B and B is an Ancestor of C, then A is an Ancestor of C
rule parentAndAncestorToAncestor {
if (
(fact Parent p) &&
(fact Ancestor a) &&
p.b.equals(a.a)
) {
assert(new Ancestor(a: p.a , b: a.b));
}
}
// Printout all Ancestors relationships
rule printAncestors {
if (fact Ancestor a) {
println(a.a + " is an ancestor of " + a.b);
}
}
// Setup some parent relations...
{
assert(new Parent(a: "Andy" , b: "Betty"));
assert(new Parent(a: "Betty" , b: "Charlie"));
assert(new Parent(a: "Charlie", b: "Donna"));
}
// Evaluate the ruleset
run();
}
below is the result:
Andy is an ancestor of Donna
Betty is an ancestor of Donna
Charlie is an ancestor of Donna
Andy is an ancestor of Charlie
Betty is an ancestor of Charlie
Andy is an ancestor of Betty
Below is an example that will illustrate this, it will find and print all ancestor relationships that are the result of three parent relationships. Andy is a parent of Betty, Betty is a parent of Charlie and Charlie is a parent of Donna. Which are the resulting ancestor relationships?
Running this program will reveal the result...
ruleset main {
class Parent {
String a;
String b;
}
class Ancestor {
String a;
String b;
}
// Convert a Parent relationship to an Ancestor relationship
rule parentToAncestor {
if ( (fact Parent p) ) {
assert(new Ancestor(a: p.a, b: p.b));
}
}
// If A is parent of B and B is an Ancestor of C, then A is an Ancestor of C
rule parentAndAncestorToAncestor {
if (
(fact Parent p) &&
(fact Ancestor a) &&
p.b.equals(a.a)
) {
assert(new Ancestor(a: p.a , b: a.b));
}
}
// Printout all Ancestors relationships
rule printAncestors {
if (fact Ancestor a) {
println(a.a + " is an ancestor of " + a.b);
}
}
// Setup some parent relations...
{
assert(new Parent(a: "Andy" , b: "Betty"));
assert(new Parent(a: "Betty" , b: "Charlie"));
assert(new Parent(a: "Charlie", b: "Donna"));
}
// Evaluate the ruleset
run();
}
below is the result:
Andy is an ancestor of Donna
Betty is an ancestor of Donna
Charlie is an ancestor of Donna
Andy is an ancestor of Charlie
Betty is an ancestor of Charlie
Andy is an ancestor of Betty
Prenumerera på:
Inlägg (Atom)

